Installing PHPUnit within a project via Composer, then running tests through PHPStorm is not an intuitive process. However, with the right steps it’s actually pretty simple. Here is my story:
To launch the call for papers for the SunshinePHP Developer Conference it was a pleasure to use the OpenCFP project as a starting point rather than creating the entire thing from scratch. While the project is still a “beta” with a few wrinkles to get ironed out, it’s still a pretty nice effort. (I have a pull requests pending, and another to submit. Love open source!)
For my CFP I wanted a few more fields of information than the “out of the box” setup, so I quickly added them to the app. However, doing this meant the included unit tests would fail. But wait, I hadn’t run the unit tests yet! I realized immediately how spoiled I had become with today’s modern frameworks with a testing method built in. This little project did not have that luxury, so I would need to run the tests the old fashioned way, or let an IDE do it for me. I decided to configure PHPStorm do it. (I’ll do the same for Zend Studio in another post later.)
The way OpenCFP was set up, using Composer, meant that PHPUnit was already placed in the /vendor directory as a requirement in the composer.json. So rather than taking the lazy way out and using the PHPUnit already installed globally on my system, I wanted to use the latest PHPUnit within the project. This requires 2 setup steps in PHPStorm.
Step 1
To start I needed to inform the IDE where to find the Composer autoload file and leverage the awesome PSR-0 goodness to autoload PHPUnit in the /vendor directory. To do this I open the Settings via the icon on the toolbar, or by using the File->Settings menu item, or hitting the Ctrl+Alt+S keyboard shortcut. Then in the Project Settings (top section) I expanded PHP to get the PHPUnit dialog.
Step 2
Now I had to add a Run/Debug Configuration for the project. I did this by clicking on the toolbar dropdown and selecting Edit Configurations.
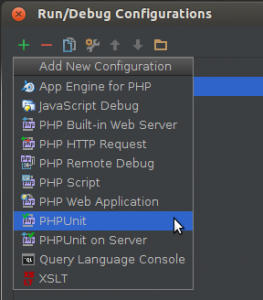
Once the dialog opened I clicked the “+” to add a run configuration, and select the PHPUnit type.
Now it was just a matter of adding the directory where the tests reside. (Name the configuration to your taste.)
All done!!! Now I was able to run the tests simply by selecting the new run configuration defined in the dropdown, and clicking the Run button in the toolbar.
Good luck, and happy testing!


